


The needlewomen, who at least once tried to embroider a cross, know what painstaking work it is.
To embroider a cross, you need to have a lot of patience. After all, even the embroidery of a small picture requires effort: each cross needs to be carefully embroidered, not to mix colors, not to forget anything.
What to say about the big work. Embroiderers who make large and complex cross-stitched paintings deserve applause and respect.
On the embroidery of one such picture can take months and even years of work.
Sooner or later, many needlewomen, trying themselves and honing their skills on simple subjects, take up large and complex paintings. Craftswomen decide that a big picture is like a small one, only it is embroidered longer.
In fact, it turns out that most of these works go to live "on the mezzanine." Many of these works are not even half done.
The fact is that the big picture is not “a lot of little ones”. Usually in the big picture and the complexity of the scheme is higher (the fragments are smaller, the scatter of the fragments is larger), and there are more colors (from 20). And the outline is smaller - for precision parts. And the work goes on for a long time, and the result is not as tangible as in small jobs.
In needlework communities, embroiderers often offer to give unfinished pictures to other craftswomen - for free - if only they finish them.
Are big paintings - the lot of calm and patient by nature masters?
Not at all!
If you are not one of the peaceful people, there is a great way for you that many embroiderers practice.
This embroidery is parallel to two or more works.
One job is big, difficult, long.
The other one is simple, light, with a small amount of flowers, large fragments.
Embroider a lot of work until you get bored, and then put it aside for a while in the closet, and take it easy. It is desirable that simple work was in color, contrasting with a lot of work.
For example: if blue prevails in a large work, take a small one with predominantly red tones. If large - in brown tones, then take a small one in green or blue tones.
After a lot of work, small ones are easy and simple to embroider. This is a kind of rest for the embroideress who wants to create constantly.
Against the backdrop of a lot of work, it will seem like a little work is done very quickly. Once, and she is ready.
And after such a rest and inspiration, again take up the great work. Cross-stitch is a fragmentary needlework. That is, there is no need to memorize the process - you can always start work from any place, from any fragment (area of the same color).
It’s not for nothing that needlewomen who order from us sofa-making machines for embroidery , in 30% of cases order an additional frame for them right away - just for this alternation. After all, what is good in this respect machine: embroidery - right on the frame - you can easily unscrew from the legs and screw another frame with another work.
Thus, the embroideress's productivity increases: instead of “hanging out” in one big picture and doing it “through I don't want”, at the same time several small works are embroidered, and the large ones are embroidered gradually.
Do not complex and do not listen to people who will tell you that you are “scattering”. When embroidering large paintings, this method is often necessary.
Let all the pictures that you started be completed. Let the world be filled with grand pictures, embroidered with a cross. Let embroidery bring you only pleasant emotions!
See you on the site
Hello! Let's get acquainted first. My name is Marina. I made my first cross about forty years ago. I am embroidering paintings about ten years. It all started with a gift (a set of embroidery paintings), which I brought my friends from Europe. It was the longest job in my life. I embroidered it for myself, but it turned out that I bought it from me (I could not resist the price), so I had orders. Initially, I had to buy kits in Europe, now it has become easier - I have already finished five works from Peony, and my customers are the quality criteria for me.
Since I am embroidering to order, time is first of all important for me, so I had to abandon the traditional methods of fastening threads, which take a lot of time and as a result, the time of sewing is increased. This led to an increase in the consumption of threads, and very significant, but here you have to choose (everyone has their own priorities), you can not rush to embroider for yourself.
First answer the frequently asked questions:
"Is it difficult to embroider these patterns?". My answer (it is clear that it is subjective): for a long time - yes, difficult - no. For me it is very strange how it can be difficult what is done with the simplest stitches in the world. And the patience of those who embroider is always a lot. Perhaps someone like me may have a condition from this work, which I call "psychological fatigue." Three days break, or increase other work and this state goes away.
��Which scheme to choose? More or less? ”In my experience, there is no difference in the heels. The difference is only in time.
And the last retreat. During otshiva, for example, there is such a situation (I sew work on colors): the thread is over, the last cross is left, for which you need to take a new thread, sometimes I take it, and sometimes I sew it with a touch that is nearby. Such liberties will not be noticeable in background scenery, in landscapes and still lifes, but don’t get too carried away. Where you can not do such things? Then, when you embroider faces, here you can get very unpleasant surprises.
The most important rule: you need to embroider with maximum comfort.
I always embroider top to bottom and left to right. One Row - this is ten cells of the scheme in height.
What we are preparing is a frame, a machine for a frame, scissors for cutting threads, two tablets (about them a little later), many, many needles, a simple pencil (alternatively, a blue felt-tip pen on a fabric that is washed with cold water), an ordinary bright felt-tip pen. About good lighting I think writing is not necessarily clear.
A little about the needles. Dear English needles tests did not stand, all constantly quickly rubbed in the ear. In the end, I stopped buying them and stopped at cheap knitting needles for embroidery. They were very pleasantly surprised, there were a few pieces of defective, and the rest were already in operation for three years, and even the gilding was not worn out, only faded. Needle size 24 or 26. I use both that and another mixed.
As if to note, the photos do not show the real picture. To see all the beauty of embroidery it is necessary to look at the "live".
Getting started.
1. I make a copy of the scheme. You never know, work is long. I never needed it. But just in case.
2. I connect the scheme. I glue at the beginning only the first uppermost sheets. It turns out a long strip. The remaining sheets will be used only when the first lane is detached. When one row remains to be removed from the first strip (I remind you that the row for me is ten cells in height), I glue the following sheets and get the second strip, which I connect to the first, and cut off all that is sewn in the first strip, etc. d.
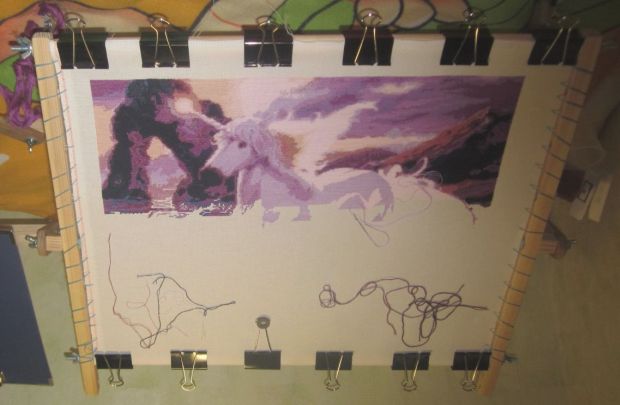
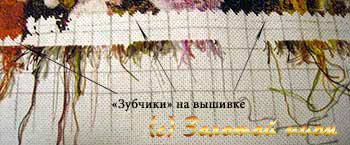
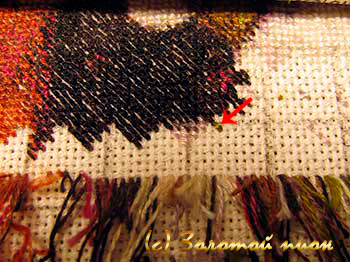
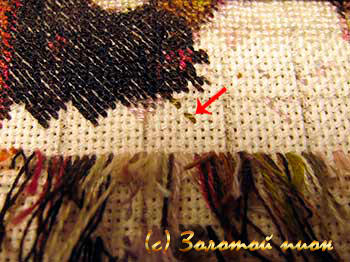
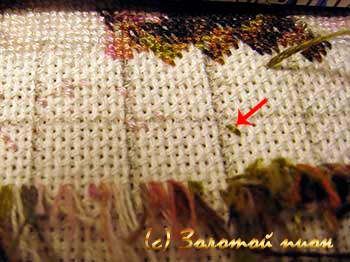
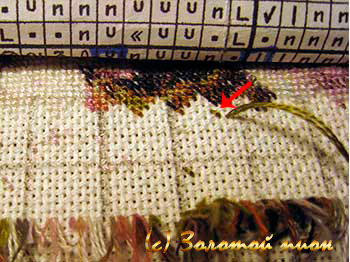
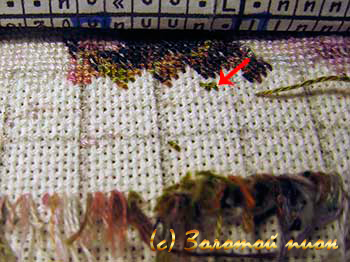
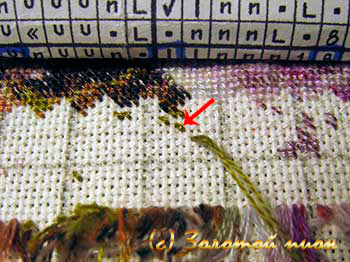
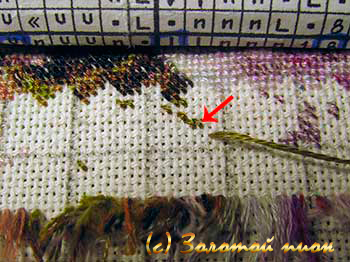
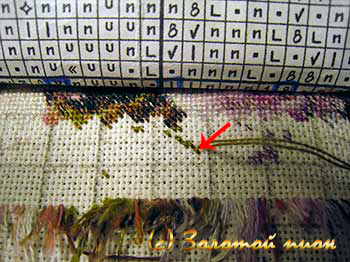
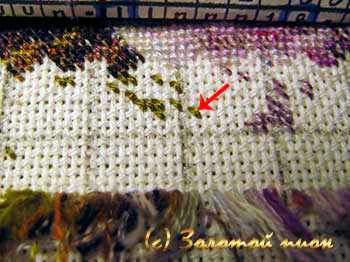
Then I take a regular marker and draw a diagram (the ladder in the photo). Each row will be dismounted with such teeth, otherwise the border between rows will be noticeable.
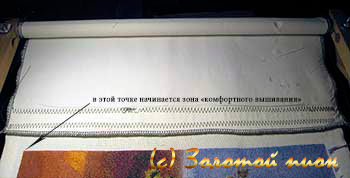
3. Fix the canvas or uniform on the frame. I always process a uniform with a zigzag, the outline is not frayed. Before fixing the canvas or uniform on the frame, on top (always) and on the bottom (not always), I build it up with a regular cloth. I do this for the sole purpose: so that the beginning and end of embroidery are in the “zone of comfortable embroidery” - hands should not reach anywhere, but lie flat on the frame.
I fix the canvas or uniform only in this way as in the photo. The front side of the work is twisted inside (somehow I historically happened this way), but the bottom is fixed this way (inside) so that the hands do not rub the front side of the fabric (this was done on purpose), let the inside out rubs
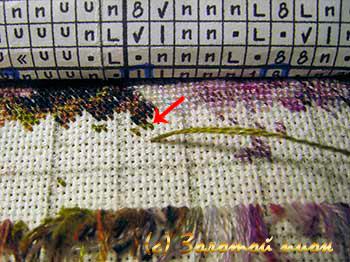
4. Lined fabric. You can use a special blue marker on the fabric, which is washed off with cold water. I stopped using it after I forgot to wash it off (there were unpleasant memories), and immediately plunged into warm water (the work was spoiled - albeit small and very unpretentious, but spoiled), since then I have been using only simple but very soft pencil (still work after erasing). Razlinovyvayu only the first four rows, as the first row will be otshit, draw another one, etc. Look at the photo above.
5. Preparation of tablets. Tablets are made of scrap materials into which a needle is easily inserted. They will hold needles with threads that are not currently involved in the work. I appeal to the organizer only when a new thread is needed.
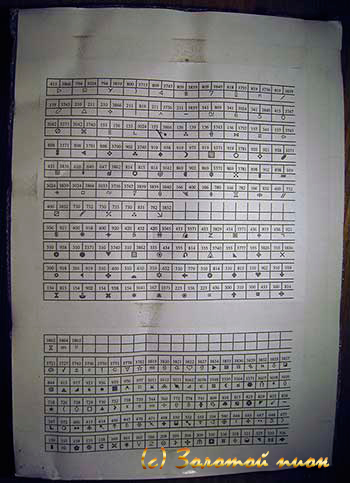
In Excel, I type symbols and thread numbers, like on an organizer. I place everything on an A4 sheet. I print several sheets and attach one sheet with ordinary tape to a tablet.
I always use two tablets. Why two identical tablets? Over time, the first tablet, will be all wasted with needles and battered. I quickly pick up and transfer needles from an old tablet to a new one. From the old tidy sheet removed and attach a new one. And again I have one working tablet with needles, another is clean.
And yet, an empty tablet helps to quickly find the desired character (sometimes all of a sudden on the working tablet the characters are lost - the threads close). Here are the tablets in the process. (Note from the Golden Peony - if you are interested in the tablet version or you come up with something else for yourself, and you need to type characters, then how to place the font with the characters on your computer, read at the bottom of the page. Not everyone has this font in system font folder.)
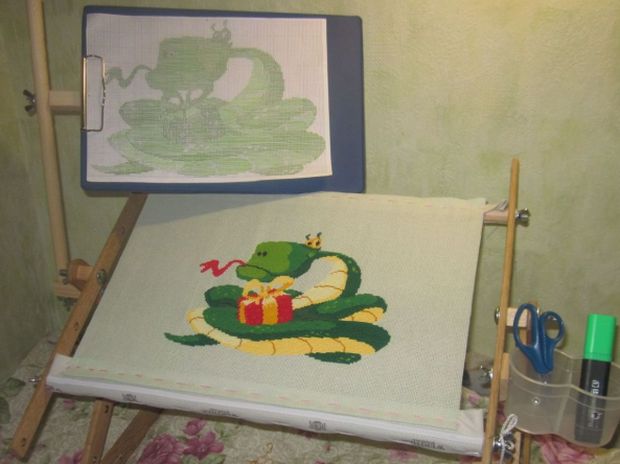
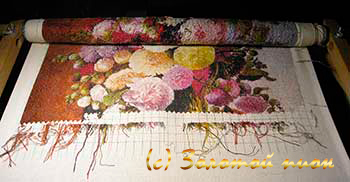
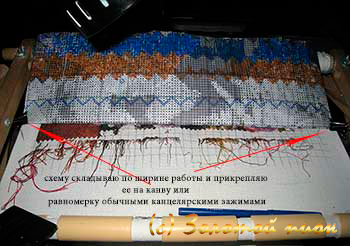
I add a long strip of the scheme to the width of the work. I fasten it to the canvas or uniform with ordinary stationery clips.
Now everything is ready, you can begin to embroider. I take a needle with a thread that matches the symbol that I will sew and start.

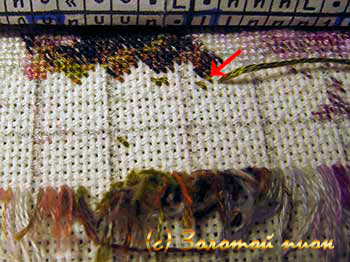
I bring the thread into operation from the front side down by 15 cells from a row, leaving a tail about 0.5 cm (I can’t fix the thread in any way, I’ll fix myself in the process). In the same way I take the thread out of work. Now you probably understand why I have a very large consumption of threads, but time is important for me.
I embroider a symbol until it is in the field of view of a row, which is sewn off as soon as this symbol has ended, I take the thread out of work and insert a needle into the tablet. Then I embroider the next character, etc. Work occurs only within the range.


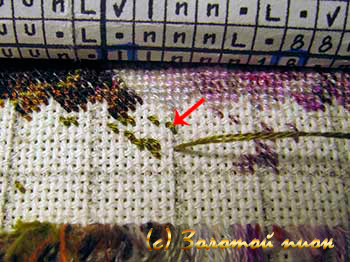

And cut, leaving the tail at least 0.5 cm, so that it was more convenient to cut them later.
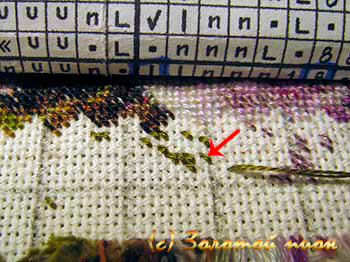
When the first row is otshit, the second row begins to otshivatsya. After removing the second row, the tails of the first row are cut off with scissors. After sewing off the third row, tails of the second row of threads are cut off, etc. Thus, I reach the last row, it is the longest in time, here it is necessary to fix the thread. I use all the ways of fixing the thread, which I know, except for the way of fixing the thread on the inside out (by the way, a very good way and fast enough to pull the thread from the inside out under the stitches, but I don’t turn the frame over during work, so I don’t use it).
I work with both hands at once, one over the frame, the second under the frame, where what, for me it does not matter - it also speeds up the work.
6. When the work is back, I take it off the frame, stripping the fabric and erasing the embroidery. I just soak it for about 20 minutes, pat it a little (I don’t wrinkle and unscrew). Now it is necessary to rinse until the water is clear (also do not unscrew anything). After the main water is drained from the back-off work, I wrap it in a towel to remove the remaining water. And give it a little dry.
7. As soon as the embroidery has dried up (should be slightly wet), I begin to smooth it out. I put my work on the face on a super soft and fluffy terry towel and start to iron out, very, very carefully. No stitch should be applied. I can add that this process is the most unpleasant for me and it seems endless.
8. Everything. There was a framing workshop. In the frame under the glass I insert myself. If you trust the framing workshop, they can also be inserted into the frame.
I hope everything I wrote turned out to be useful and understandable. Do not judge me harshly, I write something like this for the first time, especially for public reading. If something is not clear, ask questions, I will try to answer them.
Thank you very much for your attention.
PS I showed an otshiv on the example of the tapestry (semi-cross). If you embroider a full cross, the principle is the same. Difference: when embroidering with tapestry stitch, the movement in the row goes up, then down, again up and down again, etc. When cross stitching: I always start from the bottommost symbol in the row and go up, but I sew not the whole cross, but the half-cross, then I go back down, blocking the first half-cross with the second — the first column is sewn. In the second column, in the same way, I start from the bottommost symbol, fill it with a half-cross up and go back down overlapping the first half-cross. I hope it is clear.
1. Download to your computer two files with fonts.
2. Go to the local drive C. Then in the Windows folder. Locate the Fonts folder. And paste the downloaded files into it. If the Windows folder is hidden, remove this restriction on your computer.
3. Restart the computer.
Cross-stitch is a very interesting and fascinating activity, I think if you read this, then you support this my opinion. And embroidery is a lesson that is enjoyed by a much smaller number of people than just embroidery. Embroidery large and complex paintings is an occupation that takes a lot of time and effort. Some such works are embroidered not for months but for years. The more valuable is the exchange of experience and their own experience. So some elementary little things can greatly simplify the process of embroidery and significantly speed up the process.
That is so good and we have already spoken. A pencil makes life much easier and the marking of 10 * 10 squares, like in the diagram, helps to make fewer mistakes and, accordingly, less time to spend on dropping a backward-fixed error correction. So it turns out such a pencil can still greatly simplify our lives.
How, yes, very simple. It should actually gradually transfer the scheme to the canvas. Now I will explain in more detail.
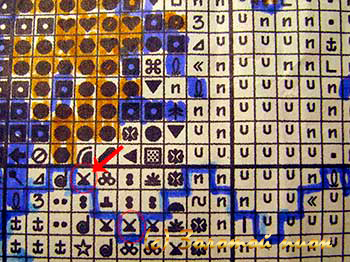
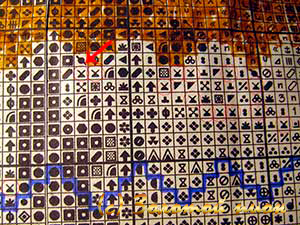
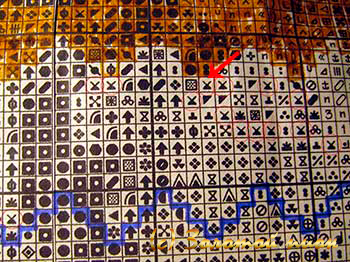
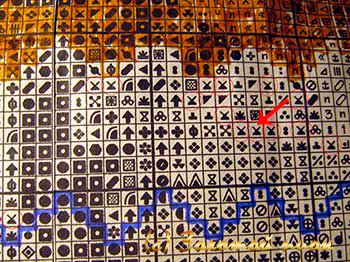
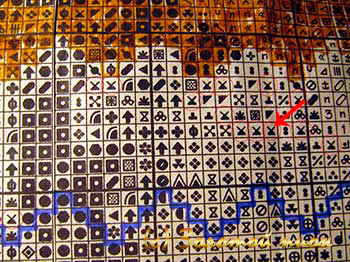
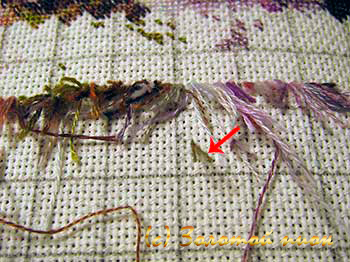
Let's say you took to embroider a picture. Suppose you decide to embroider a fragment that is on the 1st sheet of the diagram, and then go on. You have decided to start embroidering a thread, which is marked with a diamond in the diagram. Usually you embroider, turning your eyes from the scheme to embroidery and back, periodically lose where you embroidered and start looking for your own location on the scheme. In order not to be confused, cross out the embroidered crosses on the embroidery pattern. This is all wonderful I myself so embroidered for many years. It simply did not occur to me that by selecting these diamonds, it is possible to take a pencil for canvas to draw these diamonds on my embroidery. When I transferred all the diamonds to the canvas, I calmly take a needle and thread and, without thinking, I embroider on the smeared crosses. I can simultaneously watch TV or chat with loved ones. This lesson does not require attention and concentration. Embroider so very nice. At first it seemed to me that such a redrawing would take a lot of time, in fact, no. This redrawing takes an order of magnitude less time than wandering through the scheme. Moreover, when I finish embroidering these diamonds on this fragment of embroidery, I know that they will not be here anymore. This not only speeds up the embroidery process, it also organizes embroidery. Finished with diamonds, go to the circles and so on. Honestly I tell you, embroidery began to move much faster.

Blue is a pencil that draws the color to be embroidered.
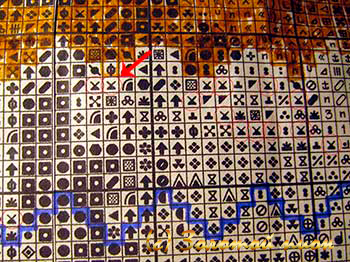
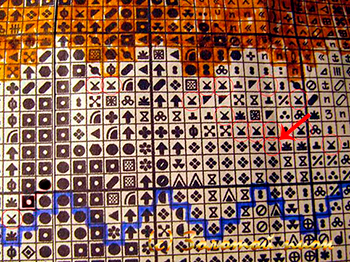
If you embroider on not too large hoops, then it will be easier for you to take a fragment that is in the hoop and stitch it in it. I personally embroider on large floor hoops and for convenience I took a fragment of 2 pages of the scheme.

Blue is a pencil that draws the color to be embroidered.
Try it, it really turns the embroidery of even a very complex picture into a pleasant pastime.
If you have some useful ideas, share them. Send me a story about how you simplify or perfect yourself the process of cross-stitching. We will be useful to each other. Send recommendations by email: [email protected]
Good luck, embroider pictures.
Add a comment
Be mutually polite. All messages are moderated manually.
Your comments.
Are big paintings - the lot of calm and patient by nature masters??Which scheme to choose?
More or less?
Where you can not do such things?
Why two identical tablets?